My short stint as one of the Virtual World’s first employees

So this weekend, I resigned from a job that I’d been working at for a little over a month. I’m pretty sure that I am one of the first people in the world to have a job in Virtual Reality, and almost positive that I’m the first to quit a job in Virtual Reality.

You’re probably pretty confused right now, I mean, people have been working in VR for quite a few years now, building things, doing lots of different things. How can I say I’m the first?

Well, the reason my job was different to all of those was not that I was working on creating virtual reality, but that I went to work in Virtual Reality. My job was as a greeter for the social VR platform High Fidelity. My shifts consisted of logging on to the platform, putting on my Vive HMD, and talking to new users – helping them work through any problems they may have, teaching them what they can do with the platform, or even teaching them some of the more advanced creation features in High Fidelity. During my time there, I talked with people all over the world – some of whom should probably have been in bed instead of hanging out in VR, but who am I to judge? I also got really familiar with a lot of the different aspects of High Fidelity – one of which, is that as an artist, if I want to build a multiplayer environment and show it to other people, I can do so without writing a single line of code or needing to do anything super technical. I can just upload my assets, drop them in the scene, move them around, visit them in VR to see how big they are, and if they make sense for the scene, and then immediately share with other people. I can’t state enough how powerful that is – and how much that appeals to the people I met during the course of my work there.

One of the things that I found most interesting, though, is how fun some things are in VR that you just wouldn’t expect. We spent a fair amount of time stacking giant boxes as high as we could go, for example. I’m sure that’s something you haven’t found fun in reality since you were probably about 2 years old, yet in VR it’s a whole new fun thing to do. Scaling yourself up or down and flying around while you talk to others is also much more entertaining than you’d think it would be. Being able to interact with your environment with other people, use things in unexpected ways, like shooting a flare gun at someone to give them a horror movie style underlight, this is something that even after months of regular VR use, I still find fun and novel, especially with other people.

It’s possible that one day, going to work in VR will be the norm for most of us – as avatars get closer and closer to accurately representing our movement and expressions, there will soon be many fewer reasons to deal with that awful commuter life. I found it to be really natural – after a couple of hours I would forget that I was at home, because I wasn’t, really. My consciousness, and my job were all focused in a virtual world. I’d be happy for most of my meetings to be in VR, I think, and as tools get better for working within VR, more and more people will be spending their work day doing the same. Imagine one day that instead of customer service being a horrible phone tree, you instead could walk down a path in VR that takes you to the person you need to talk to, complete with soothing visuals and sounds – or if you’re the customer service rep, you can spend your day in an environment of your choice while you deal with difficult customers.

I’m sad that I had to resign, this was an interesting experience for me, and everyone at High Fidelity was really great.

If you’re interested in doing my job, they’re hiring to replace me!

https://jobs.lever.co/highfidelity/12fc30ec-c262-4c2f-87d3-7eb1f047c4dd 


Who am I?

Reality, it’s one of those things that we all feel we mostly have a handle on. Most of the time, when someone asks you “Who are you?” you probably have a reasonable answer. You’re somebody’s friend, you’re someone who does a particular thing, you’re someone who has certain physical attributes, certain personality traits. You’re a big venn diagram of all of these things, and in the center of that diagram, is your sense of self, your sense of who you are.

When it comes to Virtual Reality, however, that becomes a different question with a vastly different answer – an answer you may not even know, yet.  I’ve been spending quite a lot of time lately in a few different Social VR applications. Each one has a different approach to how you appear to others, and to yourself. Rec Room, for example, has a lot of customization options to allow you to change hair, accessories, and your shirt, and you appear to others as a fairly cartoonish head, hands and torso – so you can look how you want, as long as how you want to appear is not realistic at all.  Your eyes and other facial features are 2D, drawn on.

BigScreen on the other hand, limits you further in some respects, giving you just a head and hands, though now you do have more realistic facial features – still in the stylized realm, but you feel a little less like you’re talking to a cartoon, and again, things like hairstyle, skin color, eye shape, accessories are all customizable.

Then there’s Altspace. In Altspace you’re pretty limited – there are a few different robot avatars, including one that’s basically a colored q-tip, a masculine robot, and a stylized female and male avatar. Customization here is quite limited – your only options are to change the color of your robot, or the color of your humanoid avatar. All the humans look basically the same, though, very little individuality is possible here.

Finally the other place I’ve been spending some time lately is High Fidelity. The default avatars here are pretty limited too – there’s a generic space alien default, and a couple of female and male avatars on the market place there, but one of the interesting things here is that you can also upload your own avatar. Of the avatars available, two of them are very realistic human scans, that move quite believably as the user talks. It’s easy to forget that the person you’re talking to doesn’t actually look like that in reality. One of the things that it’s possible for you to do, in High Fidelity though, is to upload a 3D scan of yourself, and to walk around in Virtual Reality as your own self. There’s also a separate company working on allowing you to play as your own 3D scanned person in a lot of different game experiences – including things like Skyrim. The company in question, Uraniom recently made a miniom of me – their name for your scanned avatar. The thing is, it’s both great, because the avatar really looks realistically like me, and also terrible, because it really looks realistically like me.

I’m not sure that I want to play as a realistic version of myself in virtual reality, because one of the appealing parts of VR is the ability to not be yourself.  I also have an avatar in High Fidelity that’s a more stylized version of me based on a scan. I’m more comfortable with that, because it looks like me, but not too much. Other people I’ve talked to, though, don’t want to ever look like themselves in VR, but they’d much rather look like an avatar that they may have identified with for a really long time – it may not look like the Reality version of themselves, but it still represents, to them, who they are.

There are other things to consider, too, when deciding if you want to be yourself in VR or not. In the real world, you can’t choose your ethnicity – or at least, you can’t choose what your ethnicity appears to be to those around you. In VR, though, you can choose to avoid the negative connotations of being black, or being female, at least visually (verbally could be another thing entirely). If you can do so, do you? How much of your identity is tied up in your gender or skin color? How about if you’re an amputee, would you decide to make your avatar reflect that? Or would you rather have all four limbs if that’s a possibility for you in virtuality? I don’t have an answer for any of these questions, partly because I think that this is something that people will decide for themselves, based on the limitations of each system. I do think that your behavior in some way is governed by how you, and others, are represented. The more realistic the avatar, the more likely someone is to treat you exactly as if you are standing in front of them – the more generic you appear, the more stylized, the less likely it is that you will feel real to the other person. We’re hardwired biologically to recognize faces, to look someone else in the eyes and recognize that there is a person inside there. If I decide to be a kitten in VR, does that detract from how other people see me?  If one day, my job involves attending meetings in VR, if I don’t look like me, is that a deal breaker? Will wearing your own skin one day be the same as those jobs where you must wear a uniform? What if I just want to be a slightly prettier, more appealing version of myself? If we can all be super attractive in VR, will we never return to reality, because your meat suit isn’t as appealing as your real life suit?

I don’t have the answer to any of these questions – but I do think that the skin we wear will determine how we are treated in VR, and so determining who we are, and how we as designers and developers allow people to represent themselves, will have ongoing implications for things like community management in the long term. When we allow people to answer the question “Who am I?” with a wide variety of options, it may be that we end up with a whole different virtual society that looks nothing like anything in existence right now. And given current events, maybe that’s a good thing.


Emotion vs Immersion

If you spend any amount of time thinking about, reading about, or developing something for VR, one of the buzzwords you hear frequently is immersion. We strive to create immersive experiences, where the viewer feels transported to a different place, but one where the paradigms are carefully managed, so that the person in the HMD feels transported – physically present in a virtual world.

Presence is the important term here. Simple things can break this sense of presence very easily – for example a camera that is too far above the ground. A missing physical body frequently can break this sense too, although including hands via either controllers like the vive or a system like the leap motion helps immensely with the sense of self that exists in the virtual reality. So developers right now spend a lot of time thinking about how to create presence, how to offer the viewer or player something that is as immersive as possible, in a variety of ways. Haptics, peripherals, devices that blow air in your face, spaces you can move around in and experience positional tracking naturally, seats that move your body in reaction to your VR experience, visual feedback in game, etc etc.

Immersion is important, but in some sense, it’s only important right now – it’s something we need to master, yes. But in 5 years, nobody will be talking about creating immersive content, it will just be one aspect of what you do. It might even be that you make conscious choices about breaking presence, in order to craft a different, hybrid reality experience. Right now, immersion is key, because when you’re new to VR, the thing that will blow your mind is actually feeling like you have been transported to some new world, some place that you are physically present. The WOW reaction that a VRgin has, is based mostly on how successfully we do this.

But that wow feeling only exists for a very short window of time. I’m past wow already, when it comes to immersion. It’s still cool, it’s still intriguing to be in a different place, but what gets me now is what is actually fun – what makes my experience great? Is it the strong visuals? (TheBlu) Interesting story? (Gone)Fun gameplay? (Goosebumps) Fear? (Dreadhalls) Sound? (Ossic)? The key going forward, I think, is going to be only partly dependent on these. Immersion will be a fact of life, but not what sells somebody on the experience you’re giving them. You won’t sell units based on immersion, unless you’re immersing someone in a completely unique place (e.g. SpaceVR) The really important thing we actually need to master is emotion. VR has a capability to create emotion in people that no medium to date has had the power to do. Yes – film can make you feel sad, or inspired, or fearful, but the inherent nature of film is that you are one step removed from that emotion. It’s temporary, it’s not part of our actual experience of the world. We remember that we saw something on a screen that evoked an emotion. When we go through an emotional journey, personally experience something like love, or fear, that is as different from the emotion you feel watching a film, as black and white television is to IMAX. VR takes you that far again into emotion. It doesn’t matter if it’s created content. It doesn’t even matter if it is realistic feeling content, our brains will experience it as though it is no different from reality. Logically, you may know that you are wearing a HMD, that it isn’t ‘real’. But viscerally and subconsciously, you will feel that emotion in the parts of your brain that are immune to reason, that existed far earlier in our evolutionary history.

Consider falling in love. What is the experience of falling in love like, from your brain’s perspective? Forget the stories we tell ourselves, consider instead what we feel when someone holds eye contact with us for the first time. What that rush of oxytocin feels like to our system. It’s not really dependent on the person we fall in love with – if it was, we’d all make far better choices when dating. It’s about the experience and feelings that the other person succeeds in creating, in us.

In VR, we can already give you eye contact, we can, within a few years, given reasonably well designed AI, successfully mimic all of the things that could make you feel love and affection for someone, only you would be falling in love with a virtual character. If that’s not something you personally find compelling, consider that the genre of books, year over year, that consistently outsells every other genre, is romance novels. There’s a reason for that – and it’s not because they’re original, or great literature. Just look at the Twilight franchise. The reason it was so successful is in part because the protagonist is an every-girl. Non-descript, Bella is what every ordinary girl dreams she could be, if only the right boy/sparkly vampire found her.  VR gives us the opportunity to play every role we ever wished for, try out being a superhero, or the girl the vampire loves, but only if we succeed in making the viewer feel that power, those emotions.

Even if you’re not interested in creating LoVR, it’s worth considering as we build narratives, and experiences, and games, that we should be creating an emotional script as we go – just as the film and animation industry create color scripts that dictate what every scene of a movie feels like, we should create emotion scripts, so at every moment in our experience, we know what emotion we are trying to create in the user, whether that is fear, love, joy, frustration, embarrassment, or anger. Even more complex emotions should not be out of reach for us, providing that is something we approach consciously. Design for the subconscious brain, make it feel, and there is no limit to what we can do with reality.


Suggestions and Guidelines for Safety in a Virtual Reality or Augmented Reality HMD during public demos.

Since someone in any kind of Head Mounted Device (HMD)  has limited to completely obscured vision, it is important to recognize appropriate behavior around them.


If you are not the person actively assisting with the demo

  • Please stay a minimum of 3 feet away from any person using an HMD, for both your own safety and theirs.
  • Do not touch the person in the HMD, with the exception of preventing imminent harm (e.g. they are about to fall). That includes not touching friends, even if you think they won’t mind, or that it will be funny. 
  • Recognize that leaving Virtual or Augmented reality can be disorienting for some, and allow people adequate time to adjust.
  • Do not take photographs of people in VR without their explicit permission.


If you are someone actively assisting with a demo, recognize that safety is the first concern.

  • Consider providing a seated experience when possible.
  • Before handing the user any equipment, explain what you are going to do, and what they are likely to experience.
  • Give users a safe place to put belongings temporarily while they are demoing.
  • If content is of a sexual or extremely graphically violent nature, warn the participant, and use your best judgment when the participant is under 18.
  • Follow current best recommended age for VR – currently, 13 and over. You may be liable for any injuries sustained to anyone under the age of 13.
  • If your content has in intense discomfort level (https://support.oculus.com/help/oculus/918058048293446/  ) warn the participant, and offer solutions for if they start to feel nauseous (e.g. “Close your eyes if you feel ill”)
  • Remind the participant that they can pause or stop the demo at any time if they are uncomfortable, either by verbally letting you know, closing their eyes, or removing the HMD
  • When starting the demo, verbally narrate your actions as you help the participant put on any equipment (e.g. “I’m going to put the headset on you now” and “Here are the headphones/controllers”)
  • Warn people that seizures or blackouts are possible for some (no great data on the risk, but without better knowledge, assume roughly the same as for TV – 1:4000), and make sure if they are feeling either prolonged dizziness or disorientation, that you encourage them not to drive.
  • Ensure sufficient clearance around the participant, and offer any appropriate safety warnings (e.g. cables, walls)
  • If using roomscale, verbally verify that the participant can see the Chaperone/Guardian barriers.
  • When possible, at crowded events, use tables or other physical barriers to separate the demo space from the general public area.
  • Use covers for HMD foam, and disinfect using alcohol wipes between each user. (https://vrcover.com/ are one provider of such covers)
  • If you are demoing using Google Cardboard (or similar devices made from porous material) please cover the areas that touch people’s face with duct tape, vinyl, or some other easily wipeable, non-porous material.
  • If necessary to touch the participant to move them, narrate your actions, and only touch the participant on the shoulders. (“I’m going to move you a step to your left”)
  • In loud places, using a microphone so you can talk to the user is useful – especially if you have sound as part of your experience (though may not be possible with mobile based VR)
  • Monitor the surroundings of the user for the entirety of the demo to ensure physical safety, and prevent damage of your equipment.
  • With desktop based non-wireless VR, be very cautious and careful about how cables are managed, especially if your demo has a lot of movement or turning involved. Better to stop the demo, than have someone trip over cables, and potentially injure themselves or your equipment.
  • Recognize that leaving Virtual or Augmented reality can be disorienting for some, and allow people as much time as they need to recover before leaving your demo area. Always ask at least one followup question as a way to gauge how they are – disoriented people may act somewhat like a drunk person, swaying, glazed eyes, confused speech.
  • A few people have mentioned never touching the HMD once it’s on the user’s head, and letting them remove it themselves, which I think is a great point – the only reason I didn’t mention it initially was that in my personal experience, sometimes people will wait for you to help them take the headset off, where others will immediately pull it off themselves. In this case, I’d suggest using your best judgement – if the demo is over, and they’re not removing it, once again, talk your way through it – “I’m going to take the headset off you now.”
  • If you are photographing or filming participants while they are trying out your demo, warn them explicitly before doing so, and get a written consent from them afterwards. This site has some great templates, and an explanation of why you need written consent. http://photography.lovetoknow.com/Photography_Release_Forms

If you are the person in the HMD

  • Respect the person giving you the demo, and their equipment.
  • Follow all guidelines they give you – they want you to have a safe and great experience.
  • Be aware that there is some risk for seizure and blackouts for a very small number of participants, although there is no great data on the frequency of this at the moment, you can assume that it is roughly the same level of incidence as for television.
  • Be aware of your surroundings prior to entering – especially how close physical objects like walls and furniture are to you.
  • Don’t use other people’s equipment if you are sick, especially if you are suffering from an upper respiratory infection, conjunctivitis, or any other highly contagious disease
  • If you start to feel nausea or other symptoms related to being in virtual reality, close your eyes, or remove the HMD.
  • At the end of a demo, remove equipment carefully, or wait for the person giving you the demo to do so.
  • If you feel excessively disoriented or dizzy after leaving VR, ask for help and do not drive until symptoms subside.
  • If you feel someone touched you inappropriately while you engaged in the experience, report this as soon as possible to the leadership team for the event.


Have more tips? Let me know! This is a living document, and I want to make sure I’m giving the best safety and awareness tips for all parties concerned.!

Gear 360 Photos – viewing in 360 and VR

So the Gear 360 camera is pretty cool – I managed to snag one at #SDC2016. I have taken a fair few pictures with it (and handed it off to a couple of other people to do the same with at recent events) and I was looking for a good way to share those images straight to the web. While there’s support out there right now for 360 video, finding a place to share photos with an embedded viewer turns out to be a bit more challenging. I did however stumble across the correct way to view your photos in the Gear VR. Spoiler alert – it’s not by doing what the 360 app tells you to do.

Presuming you have managed to get the app working with your camera so far (I didn’t suffer any major challenges getting that to work) go to the gear 360 tab, and press and hold on one of the images there. Select all the images you want to be able to view in the gear, and then hit “Save” in the top right corner. Ignore anything that says “View in Gear VR” because it’s lying – it tells you to put your phone into the Gear VR, and when you do, shows you a nice 3D slideshow environment, and never actually opens your photos 360 – just in 2D, which is probably not the reason you took a 360 image to start with.

Once you have the images transferred over to your phone (rather than residing on the 360’s memory card – though if you have a slot for it on your phone, I guess you could just transfer the card – the S6 doesn’t have one of those handy micro SD card slots) put your phone into the Gear VR after all, but navigate to the home screen.

Open the Oculus 360 Photos app – if you don’t have it in your library, install it for free from the store, though I believe it’s one of the default Oculus Apps. It will dump you straight into their featured photos. Hit the back button once, and you’ll see a handy menu. Navigate to “My Photos>Gear360” and then tap on one of the photos to start the slideshow. Swiping (forward or back) will navigate you more quickly through the images.

I’ll update this post when I figure out somewhere that will let me share the images online as 360 photospheres.

3D asset creation – a very basic primer

I’m going to do my best here to break down some terms, ideas and principles behind 3D asset creation, but this is by no means a comprehensive guide – rather I’m just going to talk about the different concepts and important ideas, so that the terminology and workflow will be easier to understand. I’m going to be using Maya in all the images, but these ideas stretch across all 3D modeling software (although CAD based software operates a little differently.) I’m also going to focus on things that are important for VR and game dev specifically, rather than high-end animation. I will bold vocabulary words the first time I use them in the text.

Modeling and Meshes

Creating any 3D asset always starts here – once you have your concept idea (maybe some sketches, or just an idea in your head, or a real world item you’re copying) the first thing you are going to do is create a polygon mesh (there are other ways to create meshes that have different strengths and weaknesses, but in general, polygons are the way you’re going to want to go for VR/game dev)

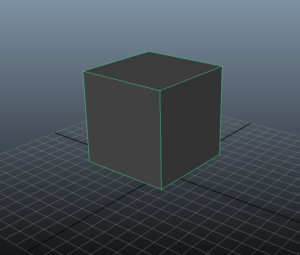
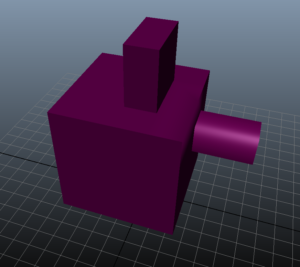
The simplest example of a polygon primitive is the plane – but the most useful is probably the simple cube. Think of a polygon as being a face of any object – in 3D modeling, every object is made up of faces (at least usually – again, there are other categories that I am not going to go into within this tutorial.) A primitive is one of a variety of basic ‘starting point’ shapes that modeling programs include. Others would be a plane, a sphere, a torus, a cylinder, etc. So in a cube, there are six polygons. We can also refer to an object created from polygons as a mesh, or polygonal mesh. 

2016-04-22

From here it’s possible to create basically every object that you can think of, with a few modeling tools.

The components of the mesh are pretty simple – each face of the cube is a polygonal face. Each green line you can see above is an edge, and the corners where those edges meet are vertices.

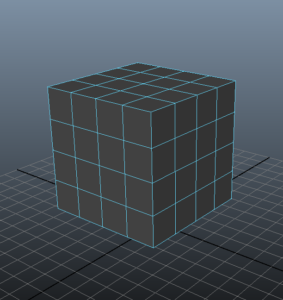
All of those things can be moved around, scaled, rotated, etc, to create new shapes. It’s also possible to add divisions to a primitive, to give you more to work with – e.g.

2016-04-22 (2)

Another way to add complexity is to use an extrude tool. What this does is allow you to select a face or an edge, and pull a whole set of faces and edges out of it – e.g.

2016-04-22 (3)

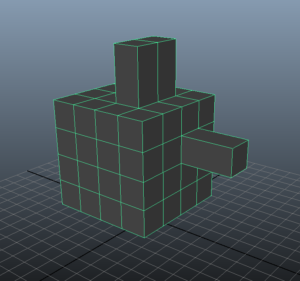
In this case, I selected three faces, and extruded them out. I could also have scaled, moved or rotated them – but now, where there was just one face, there are four more faces. There are a lot more modeling tools available to you depending on the software package, and I encourage you to experiment, but this is one easy way to build things – extruding, and then manipulating edges, faces and vertices to get the shape you want.

Polygon best practices

Bear in mind when modeling for games or for VR/AR, what you’re doing involves real time rendering – the hardware you’re using has to evaluate and display everything you create in real time. When it comes to polygons, that means using as few as you can get away with – if you have a cube with 6 faces on screen, that’s a lot cheaper than having a cube with 600 faces. Obviously building an entire scene solely from 6 sided cubes might not be what you want, but it’s worth thinking about what your polygon budget is for any given scene – benchmarks for VR are usually something like 20,000 to 100,000 polygons for a scene. So use as few as you can.

Other things to be aware of – a game engine like unity turns every polygon into a triangle, and your life will be much simpler if you avoid the use of polygons with more than 4 sides. An n-gon with 6 or 7 sides might seem more elegant sometimes, but will actually make your life harder in a few different ways. Stay simple, use quads and tris.

Materials, shaders, textures and normals oh my!

Whatever renderer you’re using, it has to be able to decide what every pixel on the screen looks like. It does this doing lots of complex math based on lighting and a variety of other things. Right now, your model is a collection of faces that are a hollow shell. Each face has an associated normal. This is an imaginary ray that points out from every face, and defines which is the front or back side of the face (most faces in 3D modeling are one sided- which means that they’re invisible from the wrong side.) Normals also govern how imaginary light rays hit the object, so editing them using a normal map lets you add complexity to your model that doesn’t require additional polygons. A normal map is a 2D image that wraps around your 3D object. The colors on the normal map don’t translate to colors on your object, they translate to edits to the normals.

2016-04-22 (5)

Vertex normals displayed above – the small green lines radiating from each vertex.

2016-04-22 (6)

In the above image, I selected two edges and “softened” the normal angle – you can see how that’s changed how we perceive the edge, even though the geometry of the cube hasn’t changed at all. A normal map is a more complex way of doing this – more on that later.

Material is something you assign to a mesh that governs how that mesh responds to light. Materials can have various qualities –reflectivity, specularity, transparency, etc, but basically a material is what your object is ‘made of.’ E.g. if I want something to be metal, metals have certain properties that are different from something I want to appear plastic, or wood, or skin. Examples of simple materials are things like lambert, blinn, phong. Bear in mind, a material is not color information, it is how something responds to light.

2016-04-22 (7)

Here’s the same shape as before, with a more shiny blinn material applied – the previous examples were all lambert.

Texture is where your color information comes in. A texture can be a simple color, or it can be something generated procedurally, or a 2D file mapped to a 3D object. Here are examples of each of those.

2016-04-22 (8)

Simple color information (note, we still have the ‘blinn’ material here, which is why this is slightly shiny)

2016-04-22 (9)

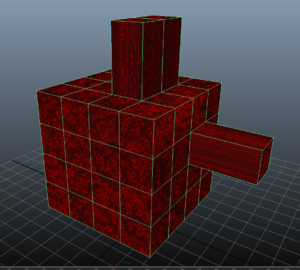
A simple procedural noise texture – this is something generated by the software based on parameters you pick. Notice how the pattern is oddly stretched in a couple of places – more on this later.

2016-04-22 (10)

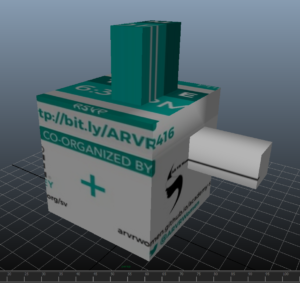
Here’s a file based texture – where a 2D image is mapped onto my 3D mesh. Notice again how there are places where the text is stretched oddly.

Final definition for this section – a shader is the part of your 3D software that takes the material, mesh, texture, lighting, camera and position information, and uses that to figure out what color every pixel should be. Shaders can do a lot of other things, and you can write them to do almost anything you want, but mostly this is something I wouldn’t worry about until later.

UV maps and more on textures.

Remember in the previous section how those textures I applied were a little wonky in places? That’s because I hadn’t properly UV unwrapped my object. A UV map is what decides how your 2D image translates to your 3D object. Think of it like peeling an orange – if you peel an orange, and lay the pieces out flat, you end up with a 2D image that describes your 3D object.

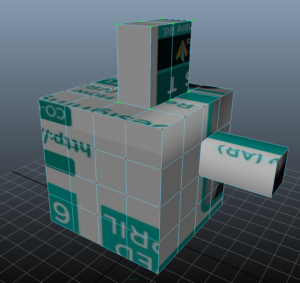
Here’s what the UV map from my last image looks like right now.

2016-04-22 (11)

You can see that there isn’t really any allowance made for my projections from the cube – what is here is just a cube map – and maybe some of the data I wanted on object isn’t displayed at all – like the faces of my event speakers.

How a UV map works is it assigns every vertex on the object to a corresponding UV. What that means is that each face then knows what area of the 2D texture image it should be displaying – and the software will stretch that image accordingly.

If I remap my cube properly, here’s what it looks like

2016-04-22 (12)

You can see now that I have my base cube, and I’ve separated out the projected pieces into their own maps – that’s why there are holds in the base cube, because that’s where those maps attach. I’m not going to go into the different ways you can unwrap objects, because it’s a fairly complex topic, and there are a lot of different ways to unwrap something, but in general, you don’t want to stretch your textures, and you want as few seams (i.e. separate pieces) as possible. It’s also possible to layer UVs over one another, if you want to use the same piece of a texture multiple times.

Here’s what the remapped cube looks like now – no more odd stretching.

2016-04-22 (13)

Final note on file textures – they should ALWAYS be square, and always a power of two number of pixels per side – e.g. 256 x 256, or 1024 x 1024.

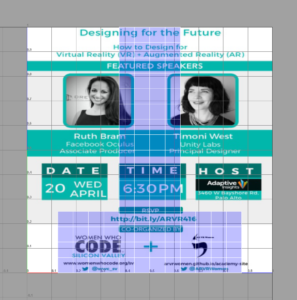
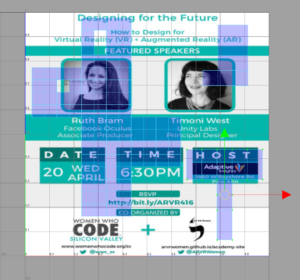
(also side note, if I was actually using this as a production piece, obviously I’d be taking more care with the image I used, instead of using a promo image for our recent event)

Normal Maps, Bump Maps, Displacement Maps

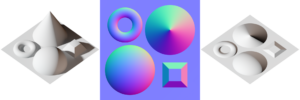
All three of the above are ways of using a 2D  image to modify the appearance of a 3D mesh. A normal map can be seen below. In this case, the image on the left is what we’re trying to represent, the image in the center is the map, and the right shows what that looks like applied to a 2D plane – it appears to have depth and height values, even though it is a single plane.


Normal_map_example_with_scene_and_result


A bump map does something similar, but uses a greyscale image to calculate ‘height from surface’ values. A bump map is very useful for doing what it says in the name – making a surface appear bumpy or rough. The thing to note with a bump map is that it doesn’t affect the edges of an object – so an extreme bump mapped plane seen from the side will just look like a plane – no bump information

A displacement map is similar to a bump map, but does seem to affect the calculated geometry of an object – ideal for adding complexity, but not usually supported in game engines. Most game engines support normal mapping as the way to add depth information to polygonal objects.

There are other types of map too, that govern things like transparency or specularity, but those are beyond the scope of this post.

Rigging!

So now we have a lovely cube, with a material and texture. If your asset isn’t intended to be have moving pieces, at this point you’re done – you’ve built your table, or chair, or book. Any animation you might do on it probably will just move the entire object. If this is not the case, however, if what you have is a character or a car, or a robot, you’re probably going to want it to be able to move.

2016-04-22 (14)

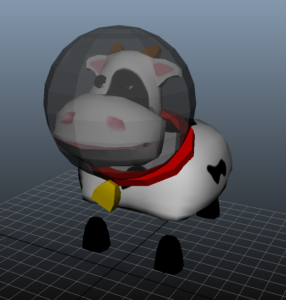
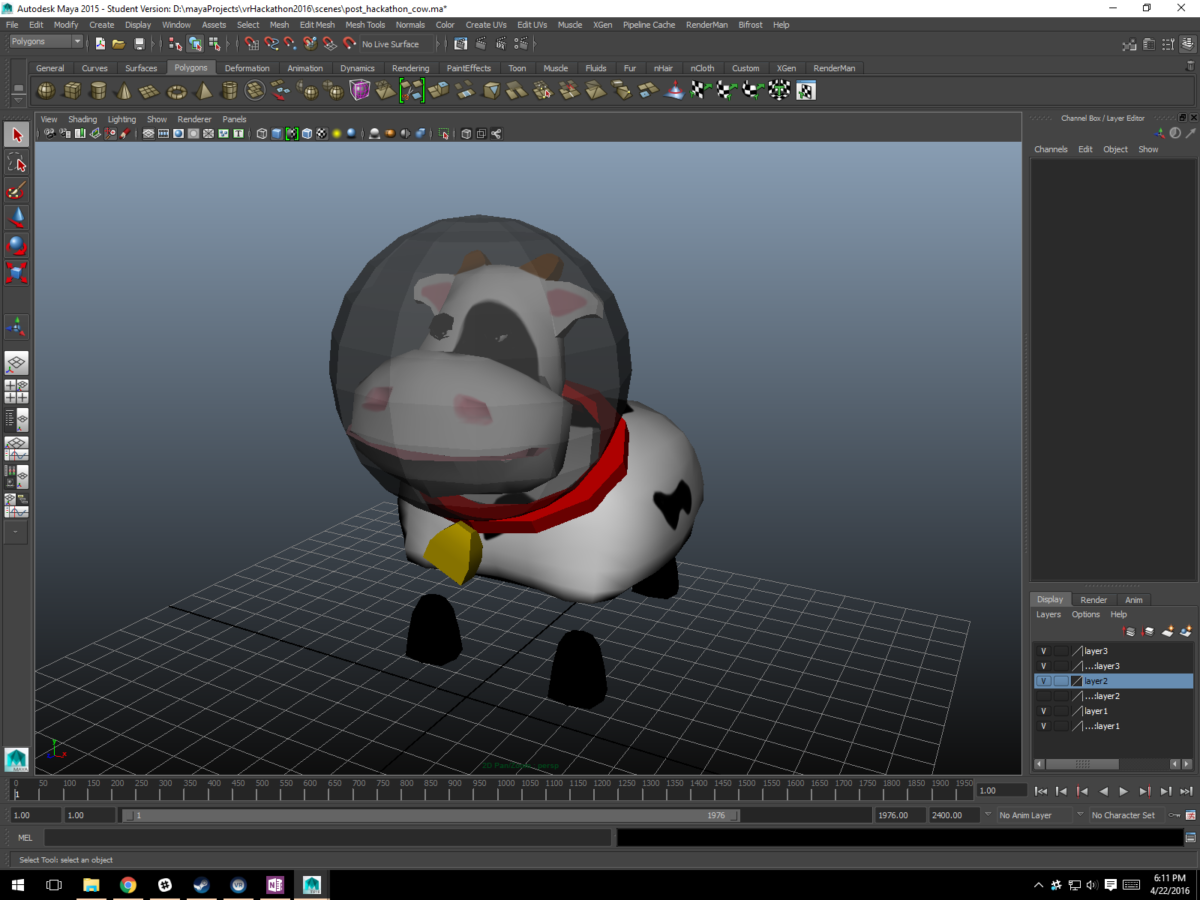
Here’s SpaceCow. SpaceCow animates –  her head and legs and body and udders all move. And that’s because I built a rig for her – a skeleton and set of controls that move that skeleton around, and that define how the skeleton moves the mesh. Rigging is a vast, deep and complex subject, so I am not going to go too far into it right now, I’ll just show you what a rig looks like and explain very briefly how that works.

2016-04-22 (15)

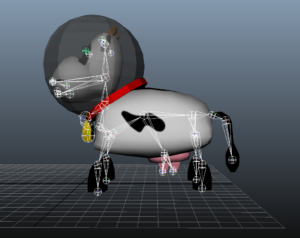
In this side shot, you can see white triangles and circles which show the joints that make up SpaceCow’s skeleton. Every part of her that I want to be able to control has a joint associated with it, and those joints are attached together in a hierarchy that governs which ones move when other joints move.

In order to animate SpaceCow, I want to be able to control and key those joints – assign specific positions at specific times or keyframes.

So I build a control structure for the joints that consist of simple curves that I can move around easily.

If I hide the joints, that structure looks like this

2016-04-22 (16)

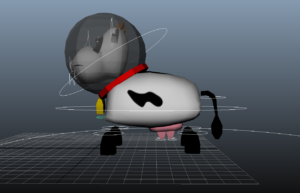
The white lines here are the control curves – each one lets me move around different parts of the skeleton. The very large line around the whole cow lets me move the entire cow, too. There are other parts of rigging that define how the mesh attaches to the joints, but that isn’t important now. If you want to learn rigging, I highly recommend Jason Schleifer’s Animator Friendly Rigging, but there are a lot of other great resources out there.

Animation

Once you have a rig in place, you can move on to animation. Animating is done by assigning keys to specific frames along a timeline. That means that for any key, I can set the properties of position, rotation, (and sometimes scaling).

2016-04-22 (17)

In the above image, I have selected the curve that governs SpaceCow’s head. The timeline at the bottom of the image shows all the keys I’ve set for her head movement – each red line represents a key that I set. The position between each key is determined by curves that interpolate smoothly from one to the next – so if my x rotation starts at 0 at frame 1, and ends at 90 at frame 100, at frame 50 it will be around the 45 degree mark. Again, this topic is more complex than I have time to go into, but this is the basics of how this works.

Conclusion

Thanks for wading through this – I know this ended up being a long document, partly because 3D asset creation is a complicated subject. Hopefully you should at least understand the basic workflow (the topics appear in the order of operation) and how everything fits together, if not how to do each specific thing. Please let me know if you are confused by any of this, or if any information is inaccurate in any way.

Thanks for reading!

Suzanne